Salesforce REST API

This post describe about the salesforce rest api and using salesforce rest api .


Salesforce implements the OAuth to authenticate soap and rest calls with the client. So I will describe with the simple steps, how to create salesforce app that expose outside to authenticate and call rest methods.

  • First you need to create a salesforce developer account if you don't have an developer account or sandbox account. If you don't have an developer account go with the following link and create an account. It's free.   https://developer.salesforce.com/signup.
    Once you create the developer account go to https://login.salesforce.com/ and login with your credentials.
       
  • Navigate to setup and type app and you will be able to find Apps section and click the link.
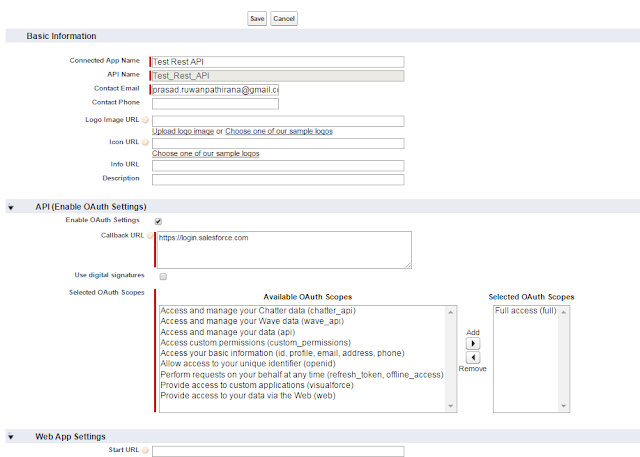
  • So now you will be able to find Connected Apps section and click New. What we doing here is creating a connected app and that app will exposing to outside to authenticate and call rest api calls.
  • So you can insert Connected App Name , API Name , Contact Email and make sure you have checked Enable OAuth Settings in API (Enable OAuth Settings). We can ignore other fields for now. Once you click the Enable OAuth Setting check box you have to fill Callback URL , that will return if the request success. So you can set https://login.salesforce.com for the Callback URL.For the Selected OAuth Scopes Give Full access(full). If you need to set the permission for the api requests you can set it here. And click Save , it will take 2- 10 minutes to make those changes take effect.


  • After Click Continue you will be able to see a screen same as below screen.
 

  • We have created the Connected App. So now we can make rest calls to salesforce from outside via  the connected app. Here we using Username-Password OAuth Authentication Flow to authenticate with our connected app , there for we should have grant_type , client_id , client_secret , username , password parameters with the request. I will explain each parameters and endpoint URL in next post.

Comments

Popular posts from this blog

Salesforce Metadata API

In this post I'm going the cover basics in the Metadata API and how it can connect with a .net console application. Then after I will show you how to create a custom object and create fields by using the metadata api from the console app. What is Salesforce Metadata API There are many things can be done from the metadata api. you can create Objects,Fields,Validation,Workflows, Profiles, Reports for a particular client organization just by running the piece of code so that you need not do all the customization settings manually which will consume time if you have to do that several times for different clients for the same configuration settings. You can also take the backup of your organization customization settings just by fetching the metadata WSDL from your Salesforce org. You can read, create, update, delete following components in a Salesforce organization. Custom Objects/Fields. Visualforce pages. Page Layouts. Validation rules. Apex. Workflows. Approval processe

Integrate .NET console application with Salesforce Rest API

According to the integration perspective in Salesforce there are several APIs to integrate with external systems. As an example there are REST API, SOAP API, Bulk API, Tooling API and Streaming API. Here I will focusing for Rest API. I have created a different post which will describing the integration with Salesforce Soap API. You can find it from  here . And for the Tooling API you can find it from  here . 1st of all you need to create a connected app in Salesforce in order to make the bridge to integrate with console app.  A connected app integrates an external application with Salesforce using APIs. Connected apps use standard SAML and OAuth protocols to authenticate, provide single sign-on, and provide tokens for use with Salesforce APIs. So I have created a separate post which will describe how to create a connected app to get consumer id and consumer secret. Please follow  this   post to get consumer id and consumer secret. After you have those details you need to create