According to the integration perspective in Salesforce there are several APIs to integrate with external systems. As an example there are REST API, SOAP API, Bulk API, Tooling API and Streaming API. Here I will focusing for Rest API. I have created a different post which will describing the integration with Salesforce Soap API. You can find it from here. And for the Tooling API you can find it from here.
1st of all you need to create a connected app in Salesforce in order to make the bridge to integrate with console app. A connected app integrates an external application with Salesforce using APIs. Connected apps use standard SAML and OAuth protocols to authenticate, provide single sign-on, and provide tokens for use with Salesforce APIs.
So I have created a separate post which will describe how to create a connected app to get consumer id and consumer secret.
Please follow this post to get consumer id and consumer secret. After you have those details you need to create a console app by using visual studio. For my case I'm using visual studio community 2017 version to create the app. And also I'm using .NET framework 4.5 as well.
Step 1 : Create console app by using visual studio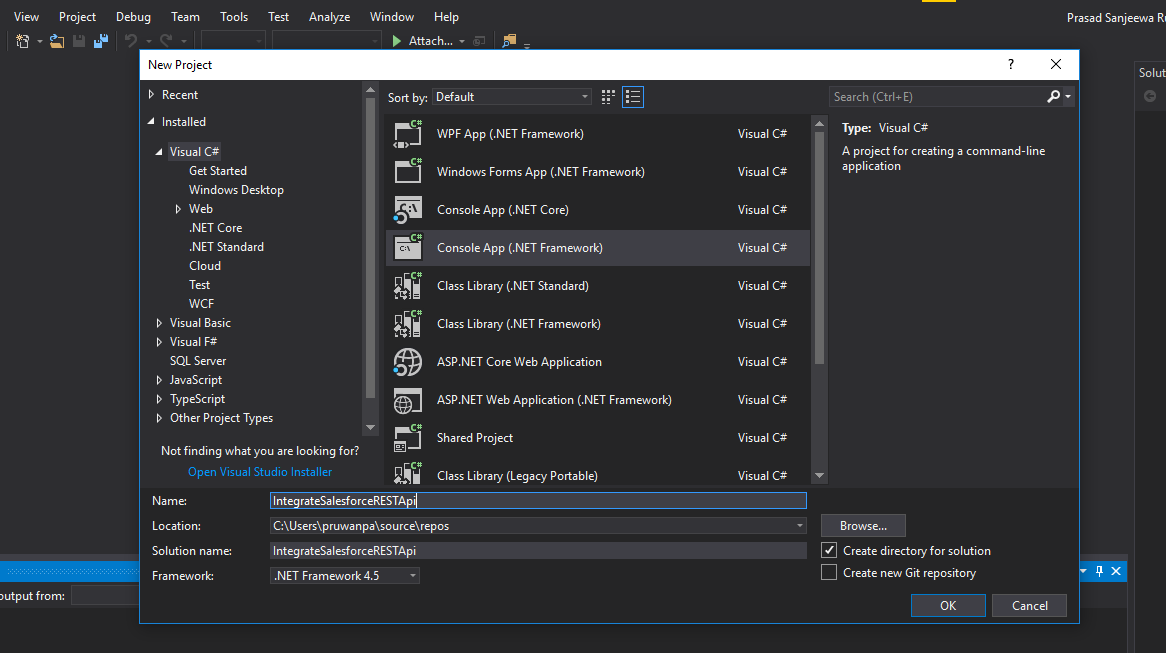
Step 2 : Create Constant and AuthResponse classes
After that I have created 2 separate classes named as Constants and AuthResponse. Constant class has all the authentication parameters and AuthResponse is the wrapper class which will hold the response from Salesforce after the authentication.
Constant Classusing System;
using System.Collections.Generic;
using System.Linq;
using System.Text;
using System.Threading.Tasks;namespace IntegrateSalesforceRESTApi
{
public static class Constants
{
public static string USERNAME = "REPLACE WITH YOUR USERNAME";
public static string PASSWORD = "REPLACE WITH YOUR PASSWORD";
public static string TOKEN = "REPLACE WITH YOUR SECURITY TOKEN";
public static string CONSUMER_KEY = "REPLACE WITH YOUR CONNECTED APP CONSUMER KEY";
public static string CONSUMER_SECRET = "REPLACE WITH YOUR CONNECTED APP CONSUMER SECRET";
public static string TOKEN_REQUEST_ENDPOINTURL = "https://login.salesforce.com/services/oauth2/token";
public static string TOKEN_REQUEST_QUERYURL = "/services/data/v43.0/query?q=select+Id+,name+from+account+limit+10";
}
}
You need to replace USERNAME, PASSWORD, TOKEN, CONSUMER_KEY, CONSUMER_SECRET with the relevant your details and connected app details. I have added TOKEN_REQUEST_ENDPOINTURL and TOKEN_REQUEST_QUERYURL to hold the login url and the soql query service which will using to get top 10 accounts from Salesforce.
AuthResponse Class
I have created this class as blank for the moment and I will explain you how to generate the contents of this wrapper class according the response by using visual studio 2017.
Step 3 : Add the code block to authenticate with Salesforce to the Program.cs file
using System;
using System.Collections.Generic;
using System.Net;
using System.Net.Http;
using System.Threading.Tasks;
namespace IntegrateSalesforceRESTApi
{
class Program
{
static void Main(string[] args)
{
System.Net.ServicePointManager.SecurityProtocol = SecurityProtocolType.Tls12;
Task authResponse = Task.Run(() => Program.AsyncAuthRequesult != null)
{
Object obj = AsyncQueryRequest();
}{
new KeyValuePair<string, string>("grant_type", "password"),
new KeyValuePair<string, string>("client_id", Constants.CONSUMER_KEY),
new KeyValuePair<string, string>("client_secret", Constants.CONSUMER_SECRET),
new KeyValuePair<string, string>("username", Constants.USERNAME),
new KeyValuePair<string, string>("password", Constants.PASSWORD + Constants.TOKEN)
});
HttpClient _httpClient = new HttpClient();
var request = new HttpRequestMessage
{
Method = HttpMethod.Post,
RequestUri = new Uri(Constants.TOKEN_REQUEST_ENDPOINTURL),
Content = content
};
var responseMessage = await _httpClient.SendAsync(request).ConfigureAwait(false);
var response = await responseMessage.Content.ReadAsStringAsync().ConfigureAwait(false);
return response;
}
}
}
Here I have used async await pattern which comes under .NET 4.5. And also I have added new method as AsyncMethod to make the authentication asyn call separately. Initially I have made the compatibility for the TLS 1.2. If you wan't to deep dive in to the TLS you can refer this official article.
And then after what I'm doing is setting up the header values in the rest request. We need to pass grant_type, client_id, client_secret, username and password with token in the header in the post request in the " https://login.salesforce.com/services/oauth2/token " url. Please note if you are using sandbox environment , then you need to replace the url as " https://test.salesforce.com/services/oauth2/token ".
I have made a separate article for the token request which will explain more. You can find it from here.Step 4 : Generate AuthResponse class from the response.
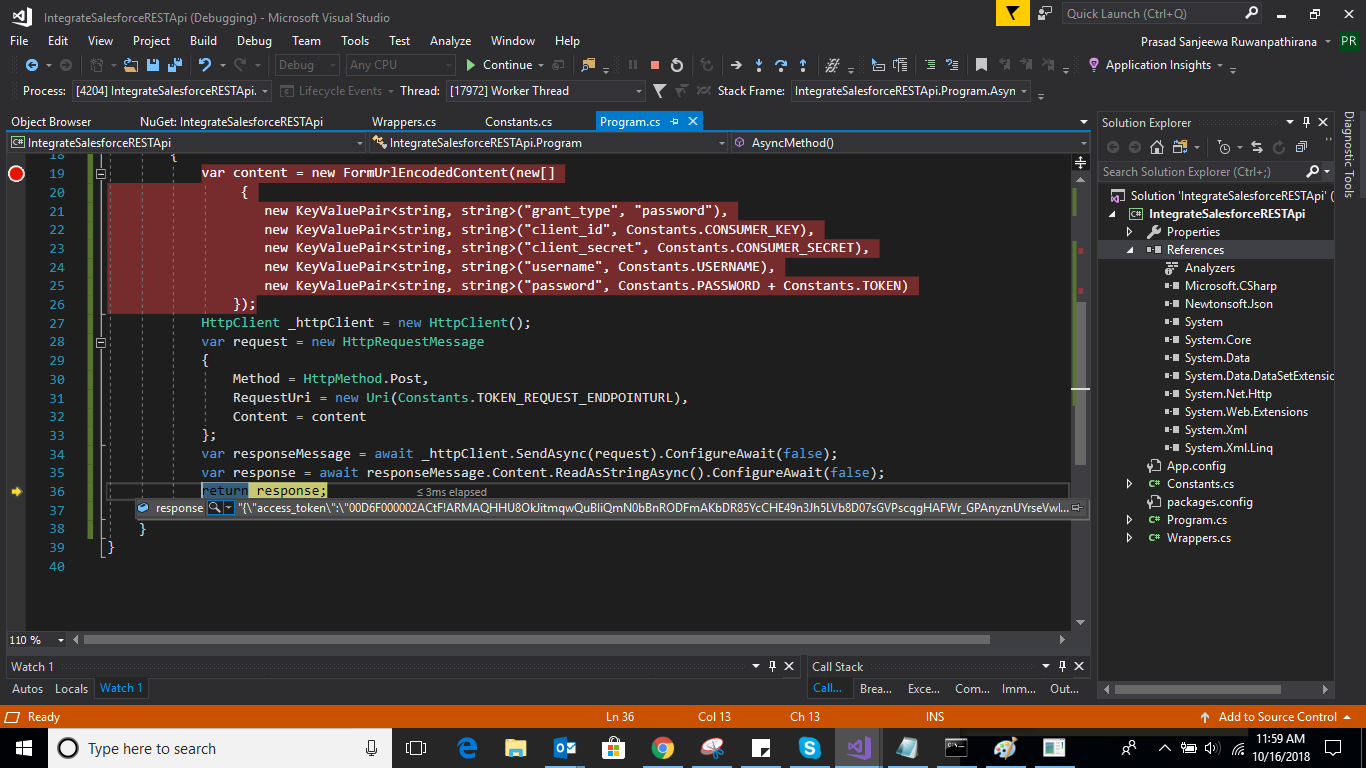
Now compile and run the project. Hopefully it should execute without errors. And then after make a debug point in the last code block which has "return response;" statement. Again run the project. Now visual studio should stop the execution in the break point which you have created earlier. So hover the response object and click on search icon as below.
Then just copy the content and go to Edit > Paste special > paste JSON as class. So you will be able to see a class as below.
public class Rootobject
{
public string access_token { get; set; }
public string in_url { get; set; }
public string id { get; set; }
public string token_type { get; set; }
public string issued_at { get; set; }
public string signature { get; set; }
}
Visual Studio made the class creation more easier by generating the wrapper classthe json response. So you just need to copy the content inside the class and paste it in AuthResponse class.
Step 5 : Add Newtonsoft.Json reference from Nuget package
Now you need to add another reference to the project by using Nuget package manager in order to support for the json format. Nuget package manager is very popular with the .NET developers because it's really easy to work with. If you not much familiar with nuget package manager it is just a package manager like npm.
Right click on the project and click Manage NuGet packages as below screen.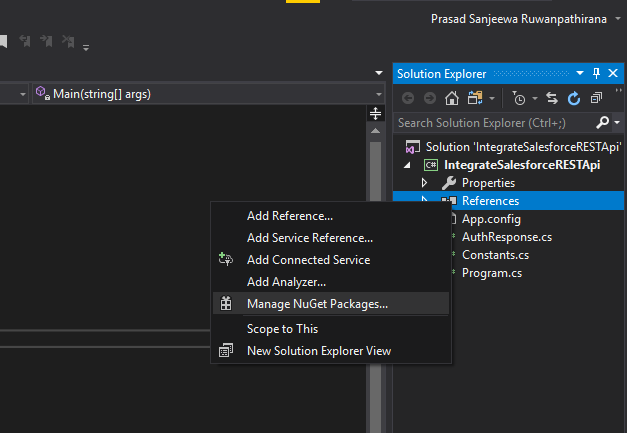
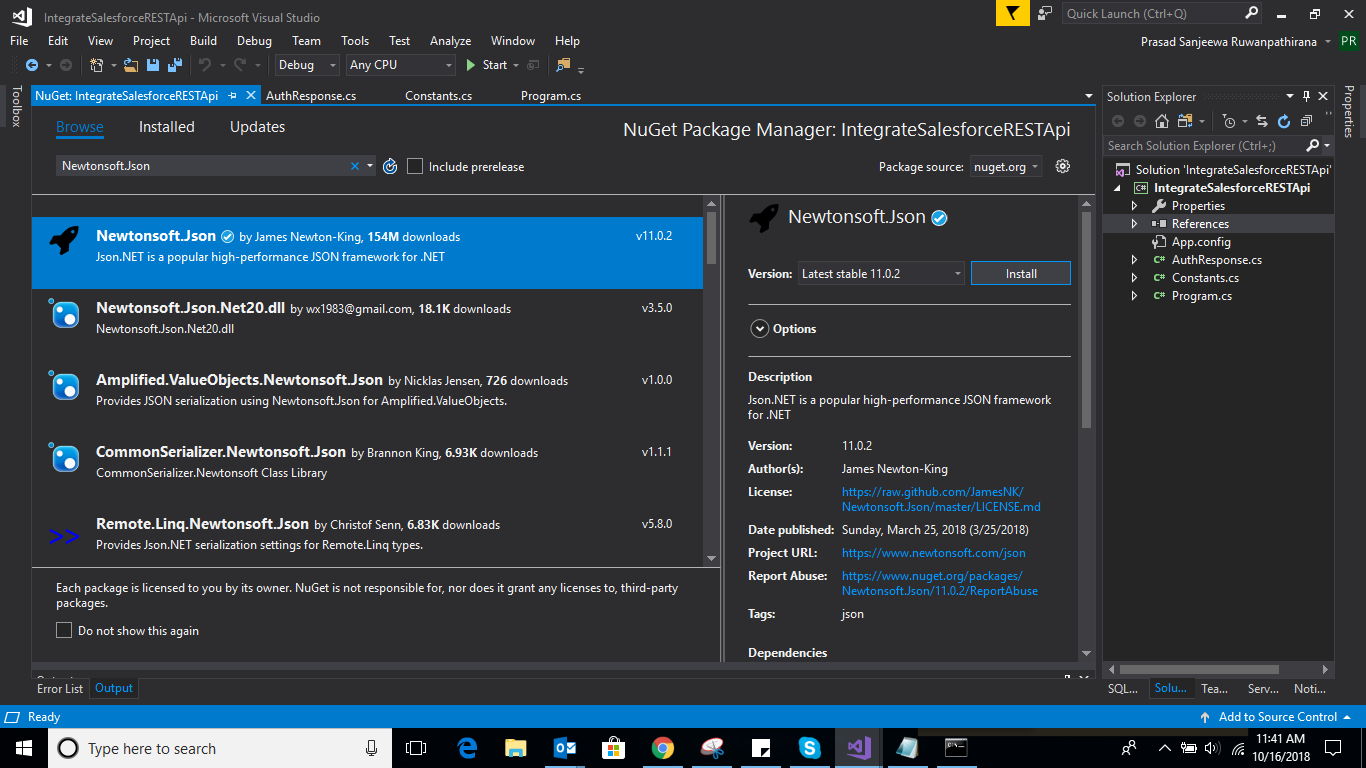
Next you need to search "Newtonsoft.Json" and Install the package.
Step 6 : Modify the class using AuthResponse wrapper class
You need to replace code blocks which will hold the response as below. And also you need to add Newtonsoft.Json reference as below.
using Newtonsoft.Json;Replace :
var responseMessage = await _httpCSendAsync(request).Conwait(false);
sponse = await responseMessage.Content.ReadAsStringAsync().ConfigureAwait(false);
return response;With :
var responseMessage = await _httpClient.SendAsync(request).Configt(false);sponse = await responseMessage.Content.ReadAsStringAsync().ConfigureAwait(false);
AuthResponse responseDyn = JsonConvert.DeserializeObject(response);
return response;So you have successfully got the response from Salesforce and parse to the AuthResponse object.
Step 6 : Get Lead data from Salesforce using query rest call
I have created an another method in the Program class in order to send query request to Salesforce in order to retrieve lead objects.
Below I have mentioned the new method with the class
using Newtonsoft.Json;
using System;
using System.Collections.Generic;
using System.Net;
using System.Net.Http;
using System.Net.Http.Headers;
using System.Threading.Tasks;
namespace IntegrateSalesforceRESTApi
{
class Program
{
static void Main(string[] args)
{
System.Net.ServicePointManager.SecurityProtocol = SecurityProtocolType.Tls12;
Task authResponse = Task.Run(() => Program.AsyncAuthRequest());
authResponse.Wait();
if(authResponse.Result != null)
{
Task leadResponse = Task.Run(() => Program.AsyncQueryRequest(authResponse.Result.access_token , authResponse.Result.instance_url));
leadResponse.Wait();
}
}
public async static Task AsyncAuthRequest()
{
var content = new FormUrlEncodedContent(new[]
{
new KeyValuePair<string, string>("grant_type", "password"),
new KeyValuePair<string, string>("client_id", Constants.CONSUMER_KEY),
new KeyValuePair<string, string>("client_secret", Constants.CONSUMER_SECRET),
new KeyValuePair<string, string>("username", Constants.USERNAME),
new KeyValuePair<string, string>("password", Constants.PASSWORD + Constants.TOKEN)
});
HttpClient _httpClient = new HttpClient();
var request = new HttpRequestMessage
{
Method = HttpMethod.Post,
RequestUri = new Uri(Constants.TOKEN_REQUEST_ENDPOINTURL),
Content = content
};
var responseMessage = await _httpClient.SendAsync(request).ConfigureAwait(false);
var response = await responseMessage.Content.ReadAsStringAsync().ConfigureAwait(false);
AuthResponse responseDyn = JsonConvert.DeserializeObject(response);
return responseDyn;
}
public async static Task AsyncQueryRequest(string token, string url)
{
HttpClient _httpClient = new HttpClient();
var request = new HttpRequestMessage
{
Method = HttpMethod.Get,
RequestUri = new Uri(url + Constants.TOKEN_REQUEST_QUERYURL),
Content = null
};
request.Headers.Authorization = new AuthenticationHeaderValue("Bearer", token);
var responseMessage = await new HttpClient().SendAsync(request).ConfigureAwait(false);
var response = await responseMessage.Content.ReadAsStringAsync().ConfigureAwait(false);
return response;
}
}
}
Here you can see that I have added AsyncQueryRequest method and it will return an Object. For the moment I have set the response in to a object and later I will show how to generate wrapper class for the response as we done earlier.
And also I have set the access token to the header which retrieved after the success authentication response. I have set the instance url which we retrieved with the same authentication response to the query request and retrieved lead data from Salesforce.
If you have done the same thing what I have mentioned here you will be able to run the console app without errors.Step 7 : Generate the wrapper class for the lead response
As we done earlier we are going to generate the response object. For that you need to make a debug point in the "return response" statement in the AsyncQueryRequest method. And then copy the response and navigate to Edit > Paste Special > paste JSON .
You will come up with a block with several classes. Next you just need to cut the generated classes code block and paste it in AuthResponse class as below. If you need you can modify the classes names.
using System;

using System.Collections.Generic;

using System.Linq;

using System.Text;

using System.Threading.Tasks;
namespace IntegrateSalesforceRESTApi
{
public class AuthResponse
{
public string access_token { get; set; }
public string instance_url { get; set; }
public string id { get; set; }
public string token_type { get; set; }
public string issued_at { get; set; }
public string signature { get; set; }
}public class Rootobject
{
public int totalSize { get; set; }
public bool done { get; set; }
public Record[] records { get; set; }
}public class Record
{
public Attributes attributes { get; set; }
public string Id { get; set; }
public string Name { get; set; }
}public class Attributes
{
public string type { get; set; }
public string url { get; set; }
}
}Step 8 : Modify the code to parse the response from Salesforce
So now you got the response with lead results from Salesforce. Then our next step would be to deserialize the json response to Rootobject which we generated earlier.
In order to do this you need to add additional reference in to your project. For that you need to add “System.Web.Extension” in to your project by right click on the references and click on Add references.
Below I mentioned the modified code block after getting the response. And make sure you have changed the return type of the AsyncQueryRequest method to
Task .var serializer = new JavaScriptSerializer();
var serializedResult = serializer.Deserialize(response);
foreach (var rootObj in serializedResult.records)
{
Record leadRecord = rootObj;
Console.WriteLine(leadRecord.Id + " " + leadRecord.Name);
}
return serializedResult;
This is the complete Program class which we have done the modification.
using Newtonsoft.Json;
using System;
using System.Collections.Generic;
using System.Net;
using System.Net.Http;
using System.Net.Http.Headers;
using System.Threading.Tasks;
using System.Web.Script.Serialization;namespace IntegrateSalesforceRESTApi
{
class Program
{
static void Main(string[] args)
{
System.Net.ServicePointManager.SecurityProtocol = SecurityProtocolType.Tls12;
Task authResponse = Task.Run(() => Program.AsyncAuthRequest());
authResponse.Wait();
if (authResponse.Result != null)
{
Task leadResponse = Task.Run(() => Program.AsyncQueryRequest(authResponse.Result.access_token, authResponse.Result.instance_url));
leadResponse.Wait();
}
}public async static Task AsyncAuthRequest()
{
var content = new FormUrlEncodedContent(new[]
{
new KeyValuePair<string, string>("grant_type", "password"),
new KeyValuePair<string, string>("client_id", Constants.CONSUMER_KEY),
new KeyValuePair<string, string>("client_secret", Constants.CONSUMER_SECRET),
new KeyValuePair<string, string>("username", Constants.USERNAME),
new KeyValuePair<string, string>("password", Constants.PASSWORD + Constants.TOKEN)
});
HttpClient _httpClient = new HttpClient();
var request = new HttpRequestMessage
{
Method = HttpMethod.Post,
RequestUri = new Uri(Constants.TOKEN_REQUEST_ENDPOINTURL),
Content = content
};
var responseMessage = await _httpClient.SendAsync(request).ConfigureAwait(false);
var response = await responseMessage.Content.ReadAsStringAsync().ConfigureAwait(false);
AuthResponse responseDyn = JsonConvert.DeserializeObject(response);
return responseDyn;
}public async static Task AsyncQueryRequest(string token, string url)
{
HttpClient _httpClient = new HttpClient();
var request = new HttpRequestMessage
{
Method = HttpMethod.Get,
RequestUri = new Uri(url + Constants.TOKEN_REQUEST_QUERYURL),
Content = null
};
request.Headers.Authorization = new AuthenticationHeaderValue("Bearer", token);
var responseMessage = await new HttpClient().SendAsync(request).ConfigureAwait(false);
var response = await responseMessage.Content.ReadAsStringAsync().ConfigureAwait(false);
var serializer = new JavaScriptSerializer();

var serializedResult = serializer.Deserialize(response);

foreach (var rootObj in serializedResult.records)

{

Record leadRecord = rootObj;

Console.WriteLine(leadRecord.Id + " " + leadRecord.Name);

}

return serializedResult;
}
}
}You have done the deserialization as well. Now you need to run the project and make sure you have add debug point in to the response. If there’s no errors in the console you will be able to see lead records with lead Id and lead name.
We have successfully retrieved lead record from Salesforce using Rest API. If you have any doubts or questions please let me know. You can get the source code of this project from here.
Thanks,
Prasad
Comments
Post a Comment