Hello Eveyone, Today I'll be focusing on Salesforce Tooling API and explaining how to integrate with a .NET console application. Here I'm using console application because I need to keep it simple. Tooling Api is available for SOAP and REST. In this post I'm focusing on SOAP which will be creating an apex class from the api.
What can do from Salesforce Tooling API- Deploy Apex, Triggers and Visualforce Pages
- Manage validation rules, static resources, workflow rules
- Manage custom fields on custom objects
- Execute tests synchronously or asynchronously
- Org wide and class specific code coverage
- Execute anonymous Apex
- Access debug logs
Tooling API is specifically designed to help developers build IDE apps for Salesforce, while the metadata API is more general purpose configuration migration. Tooling API will support for wide range of objects and you can find the list of objects from here.
Tooling API vs Metada API
Technically, the Tooling API could completely replace the metadata API, since the metadata API, came first and is less powerful, but it will be supported for some time to come yet. I have written an article about the Metadata api and you will be able to find it from here.
New projects should probably use the Tooling API as much as practical, but the metadata API is widely supported, in comparison, so it will be a while yet until it is completely replaced.
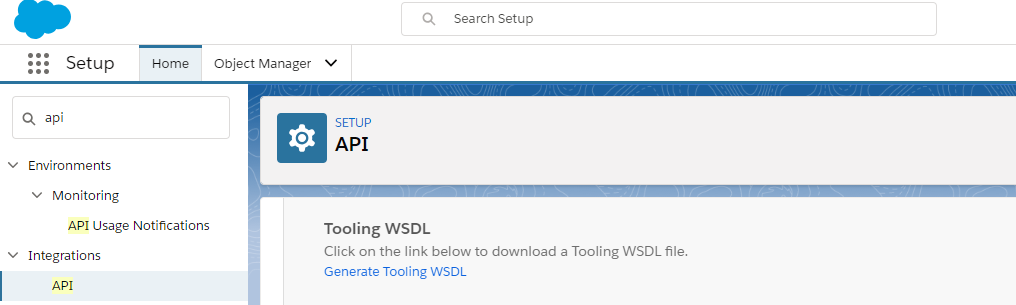
Step 1 : Get the url of the Tooling API wsdl url from Salesforce
You need to login to Salesforce and got to Setup -> Api -> Tooling WSDL -> Generate Tooling WSDL . Once you are clicking on "Generate Tooling WSDL" you will be able to see the WSDL file for the tooling api. Just copy that url keep it for the moment after later we'll use the url.
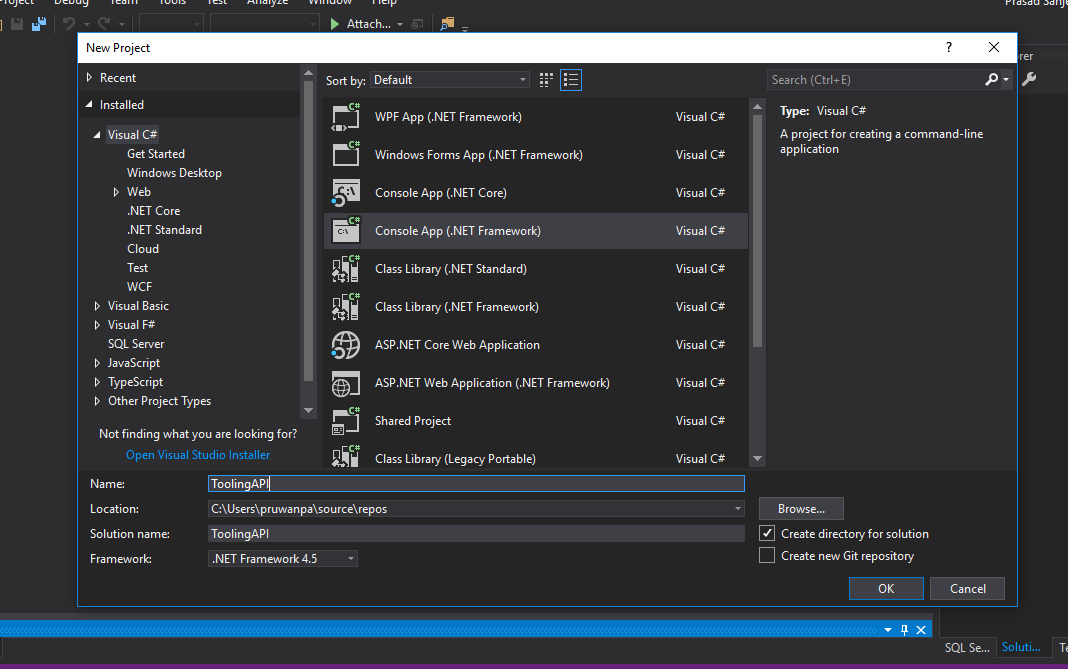
Step 2 : Create a console application to integrate Salesforce via tooling api
Our next step would be create a console application using visual studio. For my case I'm using visual studio community 2017 and I'm targeting .NET framework 4.5.
Step 3 : Get the session Id from Salesforce Rest API
In order to communicate with Salesforce from Tooling api you need a session Id. From the tooling api itself there is no login method to retrieve session id. This is same as Salesforce other apis except Enterprise/Partner and Rest API. So I'm using Salesforce REST api to get the session id. You can find my earlier post that will explaining about the session id retrieve from .net application. You can find it from here. Therefore I will just mention the related classes below and if you need any further details you can refer to the above post.
Here I have created Auth and Constants class. Auth class has GetAuthResponse method which will returning session id as a wrapper class. I have created the wrapper class as AuthResponse in the same file. The Constants class will containing the authentication parameters.
Program Classusing System;
using System.Collections.Generic;
using System.Linq;
using System.Net;
using System.Text;
using System.Threading.Tasks;
namespace ToolingAPI
{
class Program
{
static void Main(string[] args)
{
System.Net.ServicePointManager.SecurityProtocol = SecurityProtocolType.Tls12;
Task authResponse = Task.Run(() => Auth.GetAuthResponse());
authResponse.Wait();
if (authResponse.Result != null)
{
}
}
}
}Auth Class
using Newtonsoft.Json;

using System;

using System.Collections.Generic;

using System.Net.Http;

using System.Threading.Tasks;

namespace ToolingAPI

{

public class Auth

{

public async static Task GetAuthResponse()

{

var content = new FormUrlEncodedContent(new[]

{

new KeyValuePair<string, string>("grant_type", "password"),

new KeyValuePair<string, string>("client_id", Constants.CONSUMER_KEY),

new KeyValuePair<string, string>("client_secret", Constants.CONSUMER_SECRET),

new KeyValuePair<string, string>("username", Constants.USERNAME),

new KeyValuePair<string, string>("password", Constants.PASSWORD + Constants.TOKEN)

});

HttpClient _httpClient = new HttpClient();

var request = new HttpRequestMessage

{

Method = HttpMethod.Post,

RequestUri = new Uri(Constants.TOKEN_REQUEST_ENDPOINTURL),

Content = content

};

var responseMessage = await _httpClient.SendAsync(request).ConfigureAwait(false);

var response = await responseMessage.Content.ReadAsStringAsync().ConfigureAwait(false);

AuthResponse responseDyn = JsonConvert.DeserializeObject(response);

return responseDyn;

}

}

public class AuthResponse

{

public string access_token { get; set; }

public string instance_url { get; set; }

public string id { get; set; }

public string token_type { get; set; }

public string issued_at { get; set; }

public string signature { get; set; }

}

}
Constants Class
using System;

using System.Collections.Generic;

using System.Linq;

using System.Text;

using System.Threading.Tasks;

namespace ToolingAPI

{

public static class Constants

{

public static string USERNAME = "REPLACE WITH YOUR USERNAME";

public static string PASSWORD = "REPLACE WITH YOUR PASSWORD";

public static string TOKEN = "REPLACE WITH YOUR SECURITY TOKEN";

public static string CONSUMER_KEY = "REPLACE WITH THE CONSUMER KEY";

public static string CONSUMER_SECRET = "REPLACE WITH THE CONSUMER SECRET";

public static string TOKEN_REQUEST_ENDPOINTURL = "https://login.salesforce.com/services/oauth2/token";

}

}
If there's no errors you will be able to get session id from the Salesforce Rest api.
Step 4 : Add the web reference ( Tooling api wsdl ) to the console app
Next you need to add the web reference to the project. In order to do this you can download Tooling API wsdl from Salesforce and give the local path or you can just give the Toolin API wsdl url which is generated from Salesforce. In this case I'm giving the Salesforce url to the project.
You need to right click on the references and click on Add Service References and then click Add Web References button.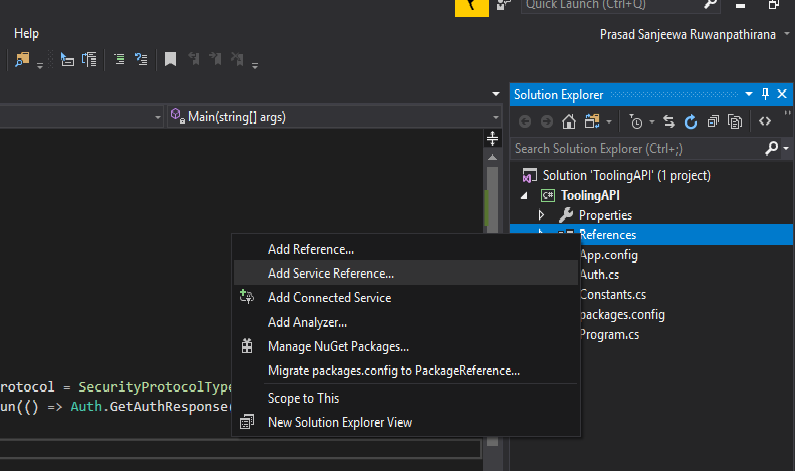
Then paste the url which you generated from Salesforce in the step 1 and paste it here. Once you click on the go button, the tooling wsdl will be visible for you. If you are not logged you might need to log in the Salesforce in order to load the wsdl.
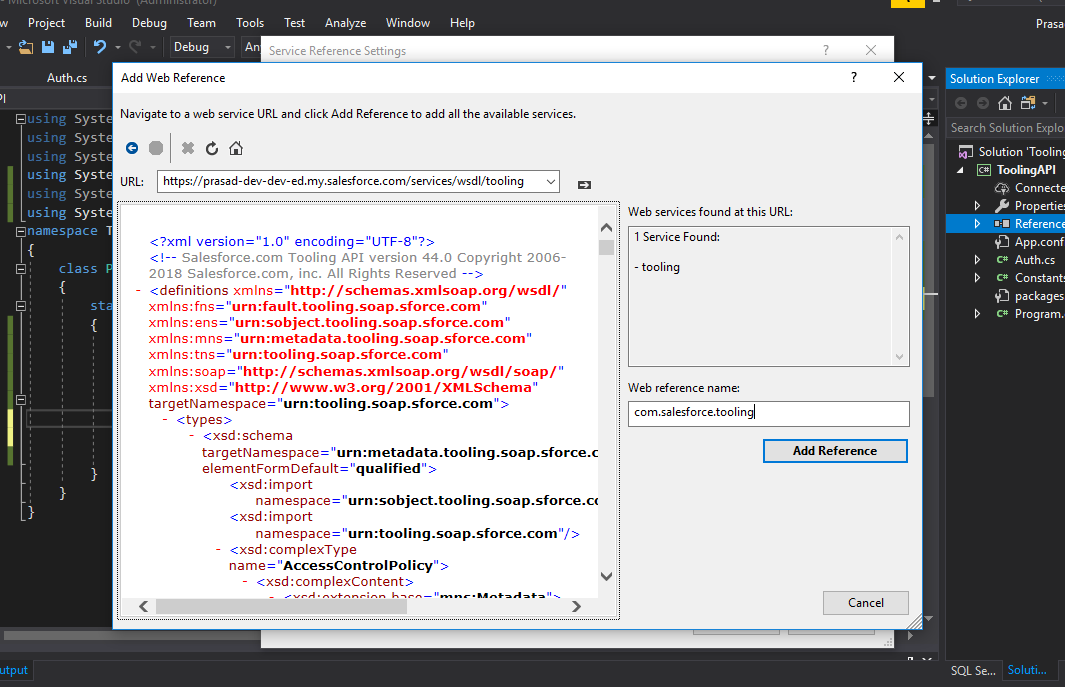
Next you need to give a web reference name and click on Add Reference. In my case I have given it as com.salesforce.tooling.
Then compile and run the project. Surely you will end up with an error as below.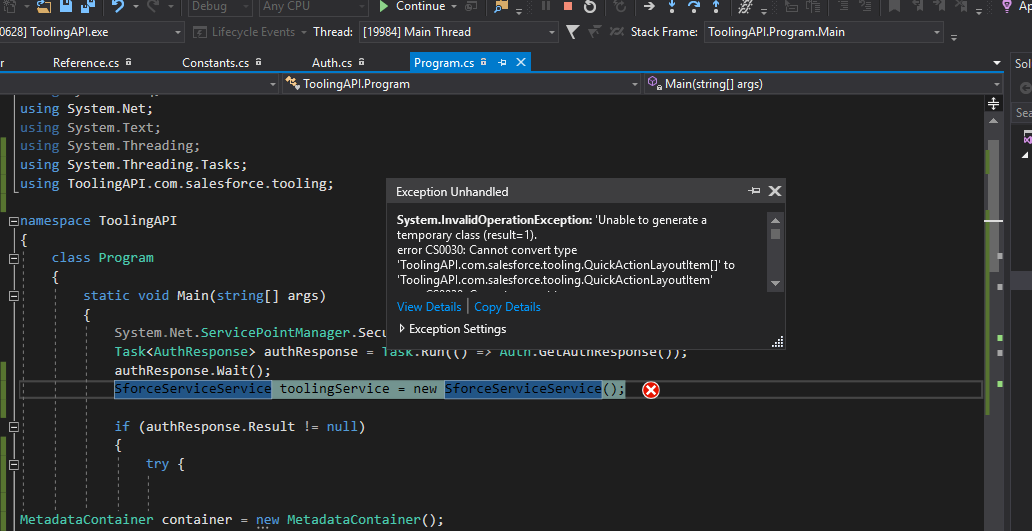
If so search [][] in the project and replace [][] with []. This is an bug when generating the reference.cs.
Step 4 : modify the codeAfter that you need to modify the code as below.
using System;

using System.Collections.Generic;

using System.Linq;

using System.Net;

using System.Text;

using System.Threading;

using System.Threading.Tasks;

using System.Web.Services.Protocols;

using ToolingAPI.com.salesforce.tooling;

namespace ToolingAPI

{

class Program

{

static void Main(string[] args)

{

System.Net.ServicePointManager.SecurityProtocol = SecurityProtocolType.Tls12;

Task authResponse = Task.Run(() => Auth.GetAuthResponse());

authResponse.Wait();

SforceServiceService toolingService = new SforceServiceService();

toolingService.Url = authResponse.Result.instance_url;

toolingService.SessionHeaderValue = new SessionHeader();

toolingService.SessionHeaderValue.sessionId = authResponse.Result.access_token.ToString();

if (authResponse.Result != null)

{

try {

ApexTrigger1 newTrigger = new ApexTrigger1();

newTrigger.Name = "TriggerOnAccountBeforeUpdate";

newTrigger.TableEnumOrId = "account";

newTrigger.Body = "trigger TriggerOnAccountBeforeUpdate on Account (before update{ }";

SaveResult[] saveResult = toolingService.create(new sObject[] { newTrigger });

}

catch (Exception e)

{

Console.WriteLine("Error occured " + e.Message.ToString());

}

}

}

}

}
Comments
Post a Comment